Table of Contents
Women since we are children want to paint our nails because we like to copy our mother, aunt or grandmother who always see them as flirtatious and beautiful.
But since nail art became so popular nowadays more and more nail designs for girls They stand out more than many of them want to have their fingers personalized with different motifs.
In this article you will be able to find nail decoration for girls who want to wear their favorite cartoon character on their fingernails or those who like hearts, funny faces, monsters, butterflies, birds, fairies, animals like dogs, bears , cats, cow among many others.
The ears of Minnie Mouse painted on each nail where it gives a touch to the girls very feminine and in turn as an adult that they want to be playing.
The painted fruit shapes do not lose their mischief where the colors flow and with great intensity offer the fingers of the hand a new entertainment.
If you are a father or a mother who is very detailed about what your daughter puts in her hands, surely you asked yourself the question ever if
In this guide to nail designs for girls you will find:
Frequent questions: Is it healthy to paint your nails when you are a girl? – What enamels should be used to paint a girl’s nails? – At what age can a girl’s nails be painted?
Videos: Emoji Nail Decoration for Girls – Minnie Mouse Nail Decoration – Unicorn Nail Decoration
Step by Step Easy Nail Designs for Girls
Nail Art Decorations for Girls: Clouds – Cupcakes – Animal Print – Hearts – Flowers – Bear – Watermelon – Frog – Rainbow – Bubbles
Is it healthy to paint your nails when you are a girl?
As long as you take the pertinent precautions about what type of nail polish you use, it can be used as long as it is considered to be a game during a special day with the parents.
It happened to me that when my daughters asked me to paint their nails with enamel, I did not see it badly, but the father did not really like the idea and we began to investigate the effects that health problems can cause a girl who puts on enamel.
And the main problem is the components by which they are made, that’s why you always have to use recognized nail polish brands.
The big problem that pediatricians do not advise from childhood to use nail polish is because it can affect the growth and development of the minor if she eats her nails.
This was the case of one of my daughters who ate her nails and wanted to paint herself to play in the beauty salon.
That is why it must be understood that it must be supervised by the parents since it can be on the one hand that it bites the nails and damages its health, or the use of enamels that are less aggressive in their chemical composition.
But there is nothing wrong with the reality that your daughter wants to imitate mom by becoming older and always be a game.
It’s like when you put on your mother’s shoes to be able to look like her, she’s playing and that’s fine.
What is wrong is to paint the nails of small to go for a walk, a birthday or go to school since she is not yet the age to understand that touch of beauty in which as I mentioned above it has to be once a year to paint and not daily.
Remember that while it is a game you can wear from your necklaces to your shoes, want to make up in front of a mirror and use a lipstick because you are the reference and you see that you are very flirtatious.
Nail painting should be like a dress-up game, you have to make them understand that they are playing and that when they go to sleep it is important to clean up, leaving them clean, if you already explain that from the beginning that begins with this need to copy yourself then then it will have a beauty behavior.
What polishes should be used to paint a girl’s nails?
Always try to compare the non-toxic and the odorless (odorless) as adult enamel always has a very strong odor that can harm the nostrils.
Remember that nail polish is chemically developed to support adult skin but not for sensitive skin that girls have and then it can lead to an allergy, itching, or an irritation problem.
In toy stores or specialized beauty salons there are 100% enamels for girls that do not have as much chemical that is made up of dyes and water ensuring that it is not harmful to the health of the little girl and that it also has all the colors that fascinate her.
The enamels that girls should not use are the so-called toxic trio that are known as those with ingredients toluene, dibutyl phthalate Y formaldehyde.
On the one hand, toluene is a solvent that you find in gasoline or gasoline, so imagine that your little one has that in her hands and that if she eats her nails she would be terrible.
On the other hand is the formaldehyde It is a well-known carcinogen that will not act at the moment but may have future effects on your growth and health development.
And finally you find the dibutyl phthalate It is prohibited by the European Union for affecting the reproductive system of women and its development, which is why you are already aware of the consequences.
That is why many times parents act out of ignorance to see our daughter’s smile but always take the necessary precautions and any questions you have you can consult on the website of The Environmental Working Group where all kinds of beauty products are rated according to the toxicity of their ingredients.
This does not mean that girls can not paint their nails since if it were so, I would never make this article, but it is important that you know it to know what type of ingredient and paint you put on your daughter’s skin, that’s why I make these suggestions .
Many mothers asked me what type of enamels they can use so that their little girls or adolescents wear them that do not include those chemical compounds that do so much harm to health and that is why investigating and asking dermatologists recommended me.
Non-toxic enamels: Scotch Naturals, Honeybee Gardens WaterColors, Zoya, Butter London Y Piggy Paint.
These brands develop nail polishes that are especially developed for the skin and nail of a girl without contaminating chemical factors, if you got to know others you can name them in the comments so that all mothers are aware of it.
At what age can a girl’s nails be painted?
The age can vary depending on each girl and each mother.
It can begin at age 3 and up, but the interest must be borne by herself without the direct influence of an adult.
Remember that it has to be a game and not follow fashion trends or the influence of an advertisement, it is time to play make the mother that every girl always wants to follow the model and example that you are because you are her hero.
Step by Step Easy Nail Designs for Girls
I’m going to start by explaining the steps that are needed to achieve some decorated nail designs for children that you will surely like to have an idea and then reproduce on your little girl’s nails.
Later you will also find different ideas with thematic motifs of the designs that girls of different ages and in different seasons most seek so that you can have a variety as a source of inspiration when it comes to giving tenderness and love to the hands of your princess.
Always consider that the nails of girls are smaller than those of an adult woman so you will have less space to make the drawings and you must have more precision with the help of your model who puts her hand since she must stay still for a few minutes for the nail polish to not run.
How to make easy nail designs for girls
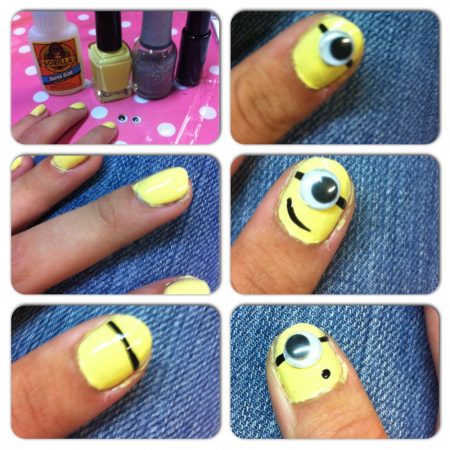
Here you can see how to use the yellow nail polish and a very original applique of an eye that moves to make the minions that you like the most.
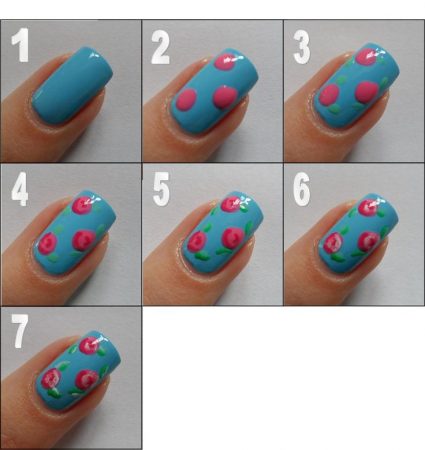
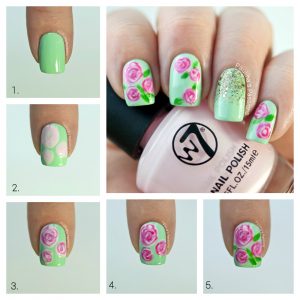
In these seven steps he explains how you can make flowers especially the roses that are so beautiful on the nails for both adult women and girls.
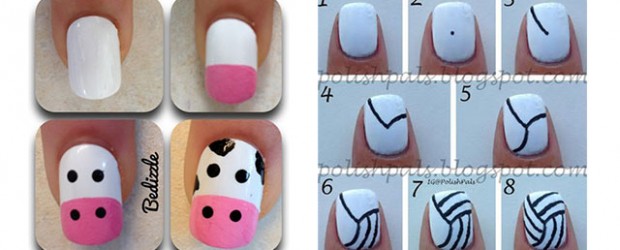
You can not miss the design of the cow that is very easy to do with a white base and black dots and its pink snout that gives a lot of tenderness.
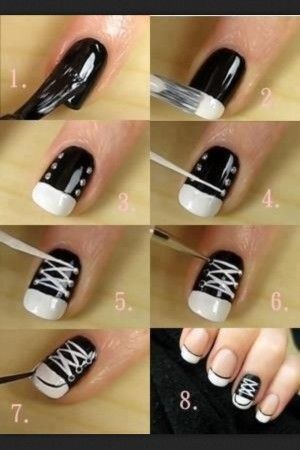
Can you imagine making yourself a fun and original shoe lace nail decoration?
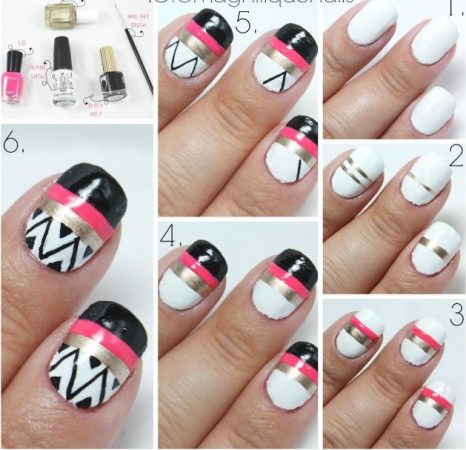
Stripes and abstract geometric figures can never be missing in a nail model where gold is the one that stands out the most.
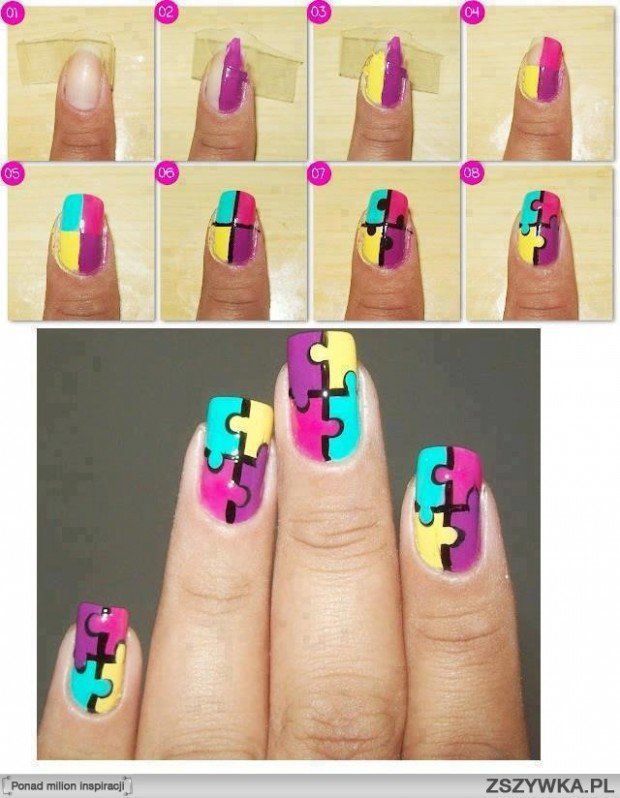
My little girl loves puzzles and I found an easy, fun, and quick way to make different colors in paints.
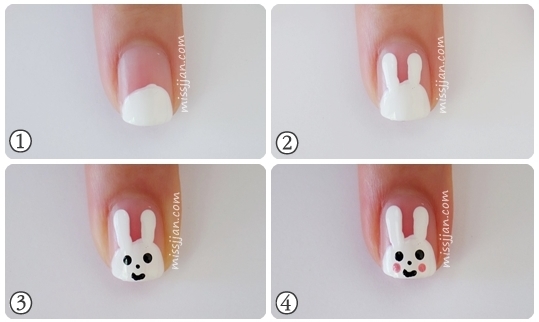
I like this bunny very much because it is very tender among the animals that you can do to your daughter in four steps.
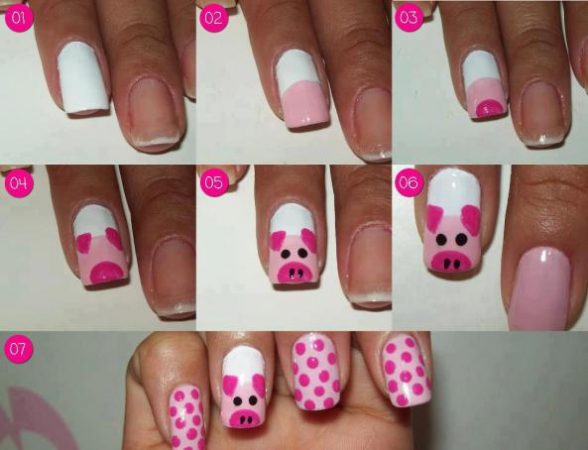
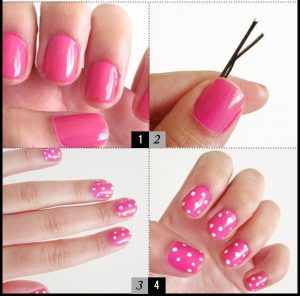
If you like the pink color on your nails then the little pig can not miss with some polka dots in different ranges and pink shades.
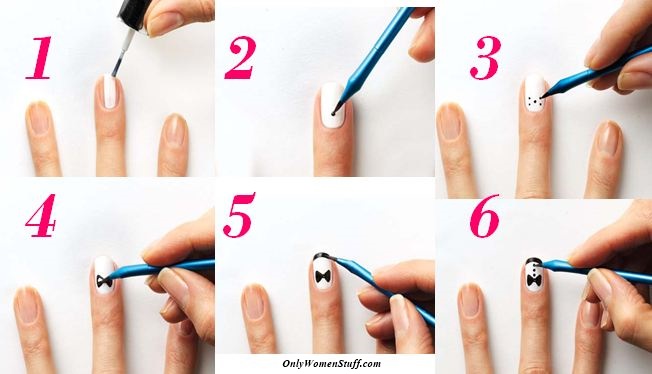
Being elegant is always very beautiful but the best thing is to know how to make a bow as if you had a suit and wear all the elegance for a party.
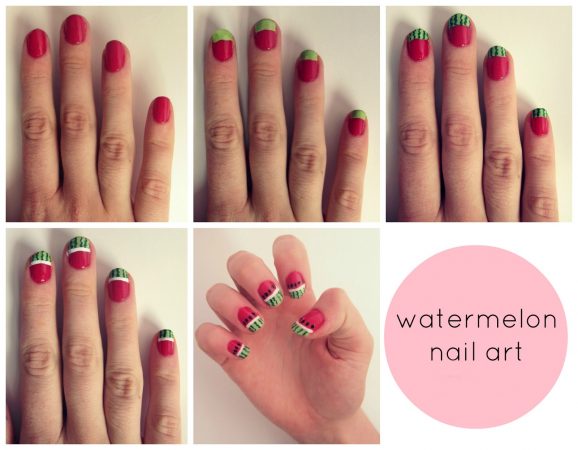
Step by Step the best fruit designs, if you look closely you can make from an apple, kiwi and watermelon among many others. It will go from being simple to very striking nails.

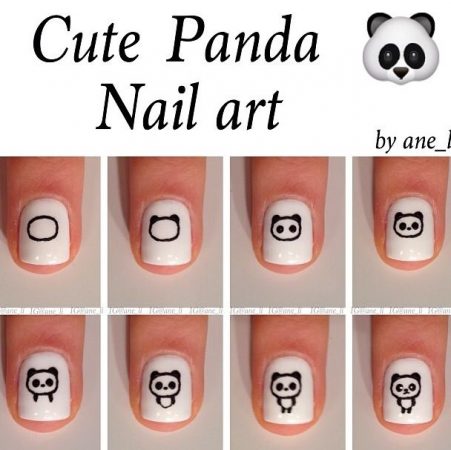
A small design for short nails of a panda bear very fashionable for nail art. Once you practice it you can do it quickly.
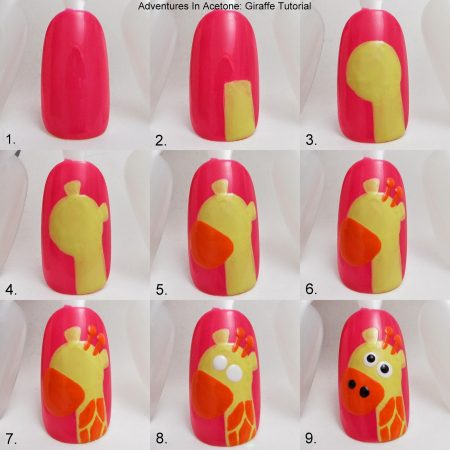
Nail decorated with a very beautiful giraffe that has a lot of detail but can be an excellent idea for long nails.
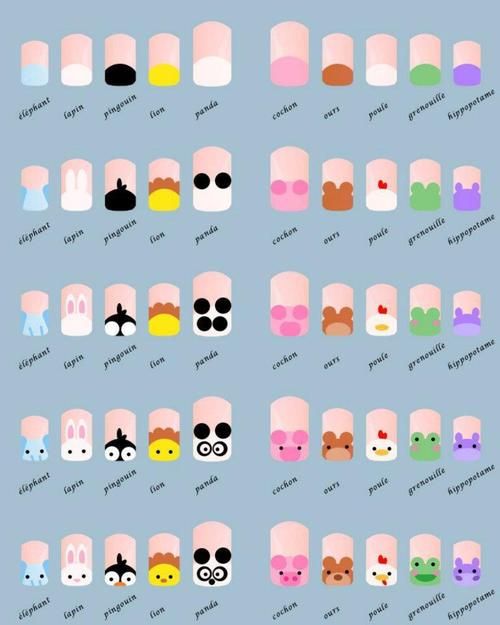
If you want to learn how to make animals step by step on your nails, it is now very easy since you can see all the steps from the base to assemble the silhouette and its model with dots and dots. They are very fun and stylish.
The fruit models to decorate the nails and hands of the girls is something that they always like for their freshness and especially the cheerful colors and this is the case of watermelon.
All the steps to make pink flowers with a pastel green base.
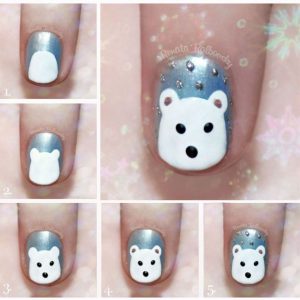
A white polar bear with some shiny stones is the proposal to learn in this visual tutorial using simple steps.
Many times you do not have all the tools to make your nail designs but that is why
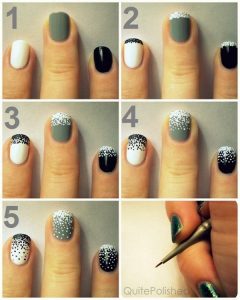
Nails decorated with small dots in shades of white, gray, black where a kind of snowfall is made with an ultra fine brush.
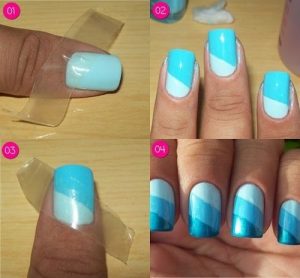
Stickers and stripes are a good combination to make straight figures in different bright shades. It is very beautiful and can be done quietly at home.
Emoji Nail Decoration for Girls
- To start doing this type of design, what you should do is paint your nails with a pastel yellow nail polish base.
- You let it dry and give it a second layer of pastel yellow to make it look more intense, always paint from the part of the cuticle towards the end of the nail.
- Now you should use a short handle detail brush, dottings tools and acrylic nail art paint.
- With the dotting and neon orange paint you make two points at each end to then make a heart on each side which would be the eyes of your emoji
- To make the heart is simple, you just have to join the two points made with the same dotting tool that you did the two points.
- With black enamel paint what you have to do is the mouth which you do with the short handle detail brush, which with it serves to fill the smiling mouth.
- To finish use the top coat to brighten your design and protect the decoration of your first emoji.
Now I will explain how to make another funny emoticon face for your nails.
- You will start by outlining the mouth with the black paint with your short-handled detail brush, then limit the area of the teeth with a black line in the middle.
- At the bottom you fill it with black enamel.
- The next step is to make two arches so that it is shaped like eyes and then the eyebrows on them in the same way but leaning more on the side of the nail.
- Now is the time to fill the mouth on the top with white nail polish to simulate the teeth of the emoji.
- With the light blue enamel you have to make the tears of laughter so characteristic of this chat character.
- Now outline the tears with a shade of blue that is darker and your design will look wonderful.
- It is time to apply the top coat so that it is fixed and you do not lose the design of this so funny emoji.
The next happy face is very striking because it will cry from laughter much louder
- To start with a fine brush to make the details you make the eyes and the eyebrows as I explained previously with two arches in dark color.
- With the blue or light blue paint you have to make lines as if it were a waterfall that comes out of the eye to the tip of the nail.
- To make the mouth you have to do it with black enamel but this time in the shape of a circle as if surprised.
- You divide it in two with a horizontal line in the middle and paint the bottom with black paint and white with the top.
- With a darker shade of blue you make the edge of prolonged crying on your emoji.
- To finish as always I recommend the top coat for a matter that will last much longer your elaborate design.
Now this emoji is the one that winks at you and that both princesses and adult women like.
- You have to use the dotting tools with black enamel to make a circle on one side as if it were a very large eye
- With the detail brush you make the other eye closed as if it were a slightly more squashed arch.
- Now with the dotting you have to make another point but with white enamel on the previous circle filled in black, making a white mole on the black.
- To make the mouth, you just make a smile line and with a red nail polish you make the tongue come out of it.
- Where you then fill the rest of the mouth and paint it all black, filling the red tongue.
- On the white mole you have to add a black dotting
This is the last emoji that is the chocolate ice cream flake or you can think of something else that became so popular because of its shape.
- For this you will have to use brown enamel making the base and fill it with your detail brush
- You do the same as before but narrower to make the shape look like a pyramid but encompassed.
- The upper part has to be pointed, you can be guided with an image in case you have any questions.
- Once it dries you have to do the mouth and eyes with white nail polish.
- You wait for the white nail polish to dry and now with the small brush you make a small black dot on the white mole.
- To finish, give it shine with the top coat.
Minnie Mouse Nail Decoration
If there is a Disney character that he likes all girls, it is undoubtedly the mouse Mickey’s girlfriend, the most popular cartoon character in the world.
Her characteristic bow and ears are a symbol that can be reproduced in a nail art design for girls that you will surely like very much and that you can then follow each step in this video.
Remember that all the steps you can read but also see in the Youtube videos that I was collecting so that you have a nice tutorial to practice and do with your daughter, goddaughter, granddaughter or niece who wants to paint her nails in a fun and entertaining way .
What this little mouse has is that it is a very fashionable character and she always likes to be fashionable although her white polka dot dress can always be seen with that red background color and is the one that we are going to reproduce on the nails.
You can do it in one or in several, try not to overload with the same drawing since it can saturate the hand with hues.
- You start by putting makeup on your nails with a nude color and you have to qualify it so that you can later make the Minnie Mouse design.
- With the dotting tool you start applying acrylic paint in a semi circle which must have a skin color very similar to the base tone but you will notice that it is somewhat brighter. Apply to the middle part starting at the end of the nail on the opposite side of the cuticle.
- Wait for the acrylic nude paint to dry and start applying black acrylic nail polish with your detail brush which has to have small and fine hairs to contour the mouse’s face.
- When you are done very patiently, make a line on the face to limit the expression of the eyes
- With a thin dotting tool and white acrylic nail polish you must make the eyes which can be guided by the video or with any image you have of Minnie.
- The mouse’s nose has to be done with a thin dotting with black acrylic enamel.
- The mouth is made with the detail brush which should only be seen at the corner
- With dotting you have to make the eyes with a black point
- You arrived at the moment of the bow that you have to use acrylic colored nail polish, to do it you have to make the center with a circle and then with the same dotting the part of the knot.
- Now you allow the red paint to dry, meanwhile making Minnie’s signature circular ear with black enamel.
- To make the white polka dots on the bun, wait for the red paint to dry and then apply with just points with the dotting and outline with black paint.
- To finish, make part of the other ear on the bun and you can paint the three tabs with a small eyeliner
- Finish with a nail fixer which prevents the decoration from being ruined and lasts longer for the girl.
As I explained before, you must make the character on a single nail to avoid overloading colors, then on the other nails you can paint red and only make white polka dots, starting a row in the middle of the polka dots and then on the sides.
Nail Designs for Girls of Hearts, Flowers, Rainbows, Bubbles, Frog, Cupcake, Clouds, Bears and Watermelon
Until now I have been explaining how to do nail decoration but with nail art tools which are not so expensive to get but many times you do not have the tools at hand.
And especially if you do not take the decoration as something professional for which I am going to teach you how to make all these designs that every girl likes because it gives a fashionable and chic touch to the hand.
Without a doubt these designs can be made by both small and large when you want to give a youthful touch to your nails.
It’s never too late to have fun and take out the girl inside you.
The flat brush is the typical nail brush that brings any type of nail polish that you buy.
It is very useful if you want to make a thick stroke and especially to make a base on the nail, that’s why it is ideal for painting your nails in a simple and fast way.
Then you can get nail brushes that are rounder and finer making it ideal for making more detailed strokes and ideal for nail art that you want to do without tools.
Depending on the brand of each enamel, the brush will be different, that is why it is always better to first make fine lines on a paper to test what type of thickness you can make and separate to know very well the decoration you are looking for.
How to make a cloud design for nails?
- It is really very simple what you should do with a light blue enamel is to first paint your nail to leave a base for the sky.
- Then you have to make small polka dots next to each other to make the clouds with white enamel.
- Gently rest the brush to make the desired effect but also leave space between the clouds.
If you want you can add stars, a sun, the moon or any fantasy decoration that you like so that the nails look beautiful and pretty.
How to make a cupcake design for nails?
These famous mini cakes that all children want to have on their birthday can now be carried in your hands to always look festive.
- The base of the cupcake has to be painted with red enamel on the end of the nail
- Once the red acrylic enamel dries, you can top it with some pink vertical lines.
- To make the cream of the cupcake what you have to do just like the clouds, you apply the brush making dots but larger on the red base.
- To finish you add the cherry at the top near the cuticle and inside the white enamel once you see that it is dry you can make some decoration with small dots with turquoise.
Always remember to finish applying enamel fixative so that your design lasts much longer.
In addition, if your nails last longer, your girl will take even more care of her hands and will not eat her nails, nor will she dirty them, since she will feel very elegant and beautiful in front of her friends.
How to make an animal print decoration for nails?
- To start, paint with a pink base that for me is the best combination that I could try and see.
- Then with an orange polish you have to make the spots that the leopard has and outline it with a black nail paint on around each spot.
This design is adorable if you like animals very much and want to look like them.
How to make nails decorated with hearts?
Ideal for princesses and romantics who like to decorate their fingers with hearts at every costume party.
Each style greatly depends on the personality of each girl, remember that some like to play mom, others to fantasy but there is always a time to be together.
This is very simple and easy is another way to make hearts in nail art.
- First I recommend putting a nude color base by tracing two curves from the outside of the nail to the center as if it were a love heart
- You let it dry and then apply the same process with the red color.
I always recommend practicing before on a sheet of paper simulating the size of the nail.
Keep in mind that since they are nail designs for girls, you have to have a small length distance, which you can practice with these models, since nail art for an adult woman with long nails is not the same as for short nails.
How to make nails decorated with flowers for girls?
This is the moment of flowers that girls like so much when spring begins and the flower party is held many times.
- To start you can make a base with a wide light blue brush.
- With small white lines as if it were a star you make the flower petals.
The amount of flowers you have to put in this case is 3 giving rise but you can also depending on the distance and size of the flower two or a large one that depends on how you like it.
If you want your flower to be a daisy then you can put an orange or yellow dot on it it will just look great as if you were a professional manicure.
How to make nail designs of a cute bear for girls?
- You have to start by making two dots with brown paint as if they were his ears.
- Then on the end of the nail you paint a circular half filled with the same color as if it were the face.
- Once the brown is dry you have to use a lighter shade and make the muzzle inside the half circle and a point on each ear.
- With the black enamel you make a point at the top of the muzzle to make the nose and eyes on each side.
It is undoubtedly a very cute animal that every little girl will want to have and remember her teddy bear.
How to make nail designs from a watermelon?
- Start by painting your nail with a dark red for the base which you already begin to give the first tone for your fruit.
- Paint a stripe on the end of the nail with white nail polish.
- Once you check that it is dry you apply a green tone on the white stripe leaving an upper white line uncovered.
- With the black enamel brush you make a few points in the smooth part of the red tone and ready the shape of watermelon you have it finished as if you were a professional manicure.
As you will notice nail art, practice, patience and creativity are essential.
Always a photo can serve you with something decorative that you think is very beautiful to carry in your hands.
For example, recently I made different decorations on my daughter’s nails with drawings of kittens, chicks, rabbits, ice cream, strawberries, sweets, cartoon characters, cartoon caricature that she always sees on television and the best thing was without having the necessary accessories for which creativity and inventiveness must always be present.
Looking for attractive drawings that you like and that seem beautiful, leaving a nice memory of childhood.
How to make nail decoration of a frog?
Makes this little animal is very simple considering that this animal is always represented by a children’s drawing such as the Pepe Toad, the Muppet Frog among many others.
- You have to choose a green nail polish and the first thing you have to do is the two eyes with two circles on each side of the nail ends.
- Next you make the face with a larger circle from the end of the nail joining the two points of the eyes and then let it dry.
- Once dry with white nail polish, make two circles inside the moles that you made the eyes.
- With black nail polish you have to make the mouth with a fine line which you should not press the brush and then with a small dot you make the iris of the eye.
How to make a girl’s rainbow nail decoration?
Since unicorns and rainbows became fashionable, more and more girls want to have their birthday themed with cakes, decorations and now is the time for nails.
- To start I recommend that you buy the seven colors of the rainbow to put with your nail polish each shade in a line next to each other vertically.
- The base of the nail must be a neutral color so that the rainbow makes more sense which I recommend you do on one or two fingers no more than that.
- You can make the lines from largest to smallest or the same height, all depending on the creativity and design you want to add.
How to make nail decoration with bubbles?
- You have to pass an enamel base that you do not have to let dry but remains damp
- With another color or shade of nail polish you add rubbery moles that you will see as they expand which will give an effect to bubbles
All these nail designs for girls you can also do on the feet with paint or apply gel nails since it is very easy and simple although it depends although the age of the girl depends a lot.
Unicorn Nail Decoration
A friend of mine saw that she had the unicorn design on one of her nails and I asked her how she made it so simple and I watch the following YouTube video.
With which he understood very well how to do it by following the steps but for that I will tell you how I did it and how beautiful they are so that all my friends then ask how they are done, you can read it in this article.
- As a first step you will apply a white base on the nail you want to make your unicorn
- The next step is with a detail brush and black paint you are going to make the ears as if it were a closed triangle at the bottom.
- With the help of a dotting tool you are going to make two circles that will be the eyes at the different ends of the nail. You have the alternative of using only a drop of enamel.
- You have to paint the inside of the ears with light pink again making another filled triangle.
- Between the ears and the eyes begin to make small flowers for that you have to make a very small point of pink and white next to each other and mix combining in a circular way.
- To make the unicorn’s eyelashes you have to do with the detail brush three curved lines that come out of the eyes.
- It is time to make the inner part of the eyes, for that what you have to do is white mole inside the black and then another smaller point to represent the tender look of the unicorn or horse
- With the top coat you finish the children’s nail art.
- But as a detail if you want you can glue an oval shiny stone to represent the horn so characteristic of this mythological and fantasy animal.
Images of Easy Nail Designs For Little Girls
little pigs
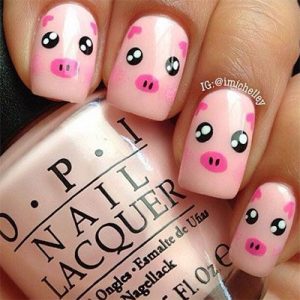
You can practice your designs in bottles before applying on the nails to be sure of what you do and have greater precision. (ademas es una buena manera de decorar bonito un elemento para el hogar)
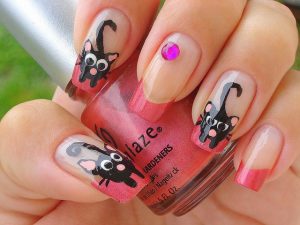
Diseños de gatos, fijate que el gato puede hacerse en uñas de gel también.
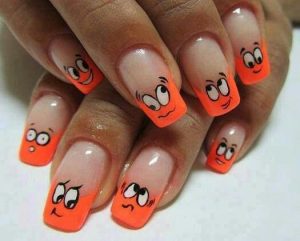
caritas
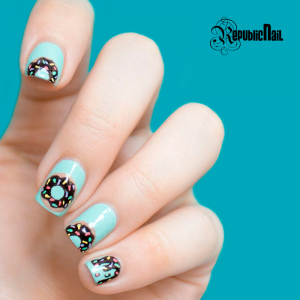
chispas
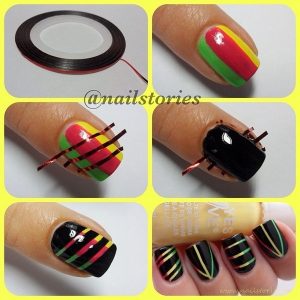
cinta
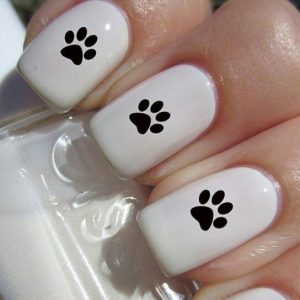
Huellas. Para que te quede linda la uña puedes utilizar un poco la lima para darle forma.
pajaritos
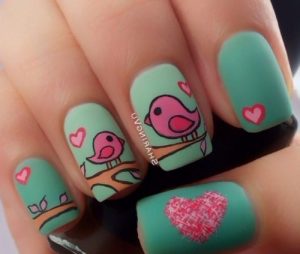
Puedes hacerte la mejor pedicure haciendo estas figuras en las uñas del pie para el verano donde se usa sandalias es algo maravilloso que le gusta a los más pequeños.
Pollito
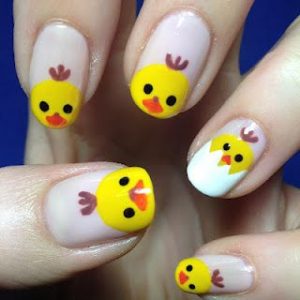
Decoración de Uñas Navideñas para Niñas
Para este caso en navidad muchas chicas quieren lucir sus uñas muy bonitas y decorativas con colores temáticos navideños como puede ser el negro, rojo y blanco.
Puedes utilizar para esto esmaltes no tóxicos o bien diseños con un pegamento adhesivo para pegar en la uña.
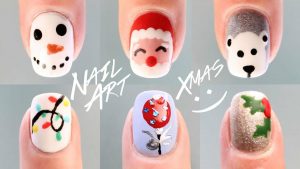
diseno unas navidad
Las pequeñas princesas aman esta fecha por la festividad por que puedes hacer desde arboles navideños, bolas decorativas, renos, regalos, santa claus y cientos de motivos que transmiten alegría y amor en este arte tan bonito.
Uñas cortas decoradas para niñas
Esta es una pregunta que me hacen ya que rara vez veremos una niña pequeña que tenga las uñas muy largas por lo cual todo tipo de modelo o figura que encuentres en este articulo puedes estar segura que se pueden realizar en uñas cortas.
Por lo cual comienza a obtener ideas y piensa como quieres que se vea la mano de tu hija para hacer un dibujo original, divertido y sobre todo entretenido para que todo sea un juego entre madre e hija en base al nailart
Nunca descuides los pies!
aunque a las pequeñas princesas les gusta verse las manos decoradas, los pies en época de verano es un factor crucial para estar arreglada y mostrarle a las amigas, principalmente por que se utiliza calzado descubierto y ademas es la temporada de piscina por el calor.
Intenta buscar diseños simples nada complicados al principio puedes compartir también en facebook o en twitter los que a ti te gustan.
O buscar nuevos diseños en pinterest o instagram que existe una amplia variedad aunque no tanto para niñas generalmente por lo cual te puedes ayudar basando en personajes de Disney que nunca fallan desde princesas hasta dibujos animados femeninos.
También te pueden interesar estos temas:
Women since we are children want to paint our nails because we like to copy our mother, aunt or grandmother who always see them as flirtatious and beautiful.
But since nail art became so popular nowadays more and more nail designs for girls They stand out more than many of them want to have their fingers personalized with different motifs.
In this article you will be able to find nail decoration for girls who want to wear their favorite cartoon character on their fingernails or those who like hearts, funny faces, monsters, butterflies, birds, fairies, animals like dogs, bears , cats, cow among many others.
The ears of Minnie Mouse painted on each nail where it gives a touch to the girls very feminine and in turn as an adult that they want to be playing.
The painted fruit shapes do not lose their mischief where the colors flow and with great intensity offer the fingers of the hand a new entertainment.
If you are a father or a mother who is very detailed about what your daughter puts in her hands, surely you asked yourself the question ever if
In this guide to nail designs for girls you will find:
Frequent questions: Is it healthy to paint your nails when you are a girl? – What enamels should be used to paint a girl’s nails? – At what age can a girl’s nails be painted?
Videos: Emoji Nail Decoration for Girls – Minnie Mouse Nail Decoration – Unicorn Nail Decoration
Step by Step Easy Nail Designs for Girls
Nail Art Decorations for Girls: Clouds – Cupcakes – Animal Print – Hearts – Flowers – Bear – Watermelon – Frog – Rainbow – Bubbles
Is it healthy to paint your nails when you are a girl?
As long as you take the pertinent precautions about what type of nail polish you use, it can be used as long as it is considered to be a game during a special day with the parents.
It happened to me that when my daughters asked me to paint their nails with enamel, I did not see it badly, but the father did not really like the idea and we began to investigate the effects that health problems can cause a girl who puts on enamel.
And the main problem is the components by which they are made, that’s why you always have to use recognized nail polish brands.
The big problem that pediatricians do not advise from childhood to use nail polish is because it can affect the growth and development of the minor if she eats her nails.
This was the case of one of my daughters who ate her nails and wanted to paint herself to play in the beauty salon.
That is why it must be understood that it must be supervised by the parents since it can be on the one hand that it bites the nails and damages its health, or the use of enamels that are less aggressive in their chemical composition.
But there is nothing wrong with the reality that your daughter wants to imitate mom by becoming older and always be a game.
It’s like when you put on your mother’s shoes to be able to look like her, she’s playing and that’s fine.
What is wrong is to paint the nails of small to go for a walk, a birthday or go to school since she is not yet the age to understand that touch of beauty in which as I mentioned above it has to be once a year to paint and not daily.
Remember that while it is a game you can wear from your necklaces to your shoes, want to make up in front of a mirror and use a lipstick because you are the reference and you see that you are very flirtatious.
Nail painting should be like a dress-up game, you have to make them understand that they are playing and that when they go to sleep it is important to clean up, leaving them clean, if you already explain that from the beginning that begins with this need to copy yourself then then it will have a beauty behavior.
What polishes should be used to paint a girl’s nails?
Always try to compare the non-toxic and the odorless (odorless) as adult enamel always has a very strong odor that can harm the nostrils.
Remember that nail polish is chemically developed to support adult skin but not for sensitive skin that girls have and then it can lead to an allergy, itching, or an irritation problem.
In toy stores or specialized beauty salons there are 100% enamels for girls that do not have as much chemical that is made up of dyes and water ensuring that it is not harmful to the health of the little girl and that it also has all the colors that fascinate her.
The enamels that girls should not use are the so-called toxic trio that are known as those with ingredients toluene, dibutyl phthalate Y formaldehyde.
On the one hand, toluene is a solvent that you find in gasoline or gasoline, so imagine that your little one has that in her hands and that if she eats her nails she would be terrible.
On the other hand is the formaldehyde It is a well-known carcinogen that will not act at the moment but may have future effects on your growth and health development.
And finally you find the dibutyl phthalate It is prohibited by the European Union for affecting the reproductive system of women and its development, which is why you are already aware of the consequences.
That is why many times parents act out of ignorance to see our daughter’s smile but always take the necessary precautions and any questions you have you can consult on the website of The Environmental Working Group where all kinds of beauty products are rated according to the toxicity of their ingredients.
This does not mean that girls can not paint their nails since if it were so, I would never make this article, but it is important that you know it to know what type of ingredient and paint you put on your daughter’s skin, that’s why I make these suggestions .
Many mothers asked me what type of enamels they can use so that their little girls or adolescents wear them that do not include those chemical compounds that do so much harm to health and that is why investigating and asking dermatologists recommended me.
Non-toxic enamels: Scotch Naturals, Honeybee Gardens WaterColors, Zoya, Butter London Y Piggy Paint.
These brands develop nail polishes that are especially developed for the skin and nail of a girl without contaminating chemical factors, if you got to know others you can name them in the comments so that all mothers are aware of it.
At what age can a girl’s nails be painted?
The age can vary depending on each girl and each mother.
It can begin at age 3 and up, but the interest must be borne by herself without the direct influence of an adult.
Remember that it has to be a game and not follow fashion trends or the influence of an advertisement, it is time to play make the mother that every girl always wants to follow the model and example that you are because you are her hero.
Step by Step Easy Nail Designs for Girls
I’m going to start by explaining the steps that are needed to achieve some decorated nail designs for children that you will surely like to have an idea and then reproduce on your little girl’s nails.
Later you will also find different ideas with thematic motifs of the designs that girls of different ages and in different seasons most seek so that you can have a variety as a source of inspiration when it comes to giving tenderness and love to the hands of your princess.
Always consider that the nails of girls are smaller than those of an adult woman so you will have less space to make the drawings and you must have more precision with the help of your model who puts her hand since she must stay still for a few minutes for the nail polish to not run.
How to make easy nail designs for girls
Here you can see how to use the yellow nail polish and a very original applique of an eye that moves to make the minions that you like the most.

In these seven steps he explains how you can make flowers especially the roses that are so beautiful on the nails for both adult women and girls.

You can not miss the design of the cow that is very easy to do with a white base and black dots and its pink snout that gives a lot of tenderness.

Can you imagine making yourself a fun and original shoe lace nail decoration?

Stripes and abstract geometric figures can never be missing in a nail model where gold is the one that stands out the most.

My little girl loves puzzles and I found an easy, fun, and quick way to make different colors in paints.

I like this bunny very much because it is very tender among the animals that you can do to your daughter in four steps.

If you like the pink color on your nails then the little pig can not miss with some polka dots in different ranges and pink shades.

Being elegant is always very beautiful but the best thing is to know how to make a bow as if you had a suit and wear all the elegance for a party.

Step by Step the best fruit designs, if you look closely you can make from an apple, kiwi and watermelon among many others. It will go from being simple to very striking nails.

A small design for short nails of a panda bear very fashionable for nail art. Once you practice it you can do it quickly.

Nail decorated with a very beautiful giraffe that has a lot of detail but can be an excellent idea for long nails.

If you want to learn how to make animals step by step on your nails, it is now very easy since you can see all the steps from the base to assemble the silhouette and its model with dots and dots. They are very fun and stylish.

The fruit models to decorate the nails and hands of the girls is something that they always like for their freshness and especially the cheerful colors and this is the case of watermelon.

All the steps to make pink flowers with a pastel green base.

A white polar bear with some shiny stones is the proposal to learn in this visual tutorial using simple steps.

Many times you do not have all the tools to make your nail designs but that is why

Nails decorated with small dots in shades of white, gray, black where a kind of snowfall is made with an ultra fine brush.

Stickers and stripes are a good combination to make straight figures in different bright shades. It is very beautiful and can be done quietly at home.

Emoji Nail Decoration for Girls
- To start doing this type of design, what you should do is paint your nails with a pastel yellow nail polish base.
- You let it dry and give it a second layer of pastel yellow to make it look more intense, always paint from the part of the cuticle towards the end of the nail.
- Now you should use a short handle detail brush, dottings tools and acrylic nail art paint.
- With the dotting and neon orange paint you make two points at each end to then make a heart on each side which would be the eyes of your emoji
- To make the heart is simple, you just have to join the two points made with the same dotting tool that you did the two points.
- With black enamel paint what you have to do is the mouth which you do with the short handle detail brush, which with it serves to fill the smiling mouth.
- To finish use the top coat to brighten your design and protect the decoration of your first emoji.
Now I will explain how to make another funny emoticon face for your nails.
- You will start by outlining the mouth with the black paint with your short-handled detail brush, then limit the area of the teeth with a black line in the middle.
- At the bottom you fill it with black enamel.
- The next step is to make two arches so that it is shaped like eyes and then the eyebrows on them in the same way but leaning more on the side of the nail.
- Now is the time to fill the mouth on the top with white nail polish to simulate the teeth of the emoji.
- With the light blue enamel you have to make the tears of laughter so characteristic of this chat character.
- Now outline the tears with a shade of blue that is darker and your design will look wonderful.
- It is time to apply the top coat so that it is fixed and you do not lose the design of this so funny emoji.
The next happy face is very striking because it will cry from laughter much louder
- To start with a fine brush to make the details you make the eyes and the eyebrows as I explained previously with two arches in dark color.
- With the blue or light blue paint you have to make lines as if it were a waterfall that comes out of the eye to the tip of the nail.
- To make the mouth you have to do it with black enamel but this time in the shape of a circle as if surprised.
- You divide it in two with a horizontal line in the middle and paint the bottom with black paint and white with the top.
- With a darker shade of blue you make the edge of prolonged crying on your emoji.
- To finish as always I recommend the top coat for a matter that will last much longer your elaborate design.
Now this emoji is the one that winks at you and that both princesses and adult women like.
- You have to use the dotting tools with black enamel to make a circle on one side as if it were a very large eye
- With the detail brush you make the other eye closed as if it were a slightly more squashed arch.
- Now with the dotting you have to make another point but with white enamel on the previous circle filled in black, making a white mole on the black.
- To make the mouth, you just make a smile line and with a red nail polish you make the tongue come out of it.
- Where you then fill the rest of the mouth and paint it all black, filling the red tongue.
- On the white mole you have to add a black dotting
This is the last emoji that is the chocolate ice cream flake or you can think of something else that became so popular because of its shape.
- For this you will have to use brown enamel making the base and fill it with your detail brush
- You do the same as before but narrower to make the shape look like a pyramid but encompassed.
- The upper part has to be pointed, you can be guided with an image in case you have any questions.
- Once it dries you have to do the mouth and eyes with white nail polish.
- You wait for the white nail polish to dry and now with the small brush you make a small black dot on the white mole.
- To finish, give it shine with the top coat.
Minnie Mouse Nail Decoration
If there is a Disney character that he likes all girls, it is undoubtedly the mouse Mickey’s girlfriend, the most popular cartoon character in the world.
Her characteristic bow and ears are a symbol that can be reproduced in a nail art design for girls that you will surely like very much and that you can then follow each step in this video.
Remember that all the steps you can read but also see in the Youtube videos that I was collecting so that you have a nice tutorial to practice and do with your daughter, goddaughter, granddaughter or niece who wants to paint her nails in a fun and entertaining way .
What this little mouse has is that it is a very fashionable character and she always likes to be fashionable although her white polka dot dress can always be seen with that red background color and is the one that we are going to reproduce on the nails.
You can do it in one or in several, try not to overload with the same drawing since it can saturate the hand with hues.
- You start by putting makeup on your nails with a nude color and you have to qualify it so that you can later make the Minnie Mouse design.
- With the dotting tool you start applying acrylic paint in a semi circle which must have a skin color very similar to the base tone but you will notice that it is somewhat brighter. Apply to the middle part starting at the end of the nail on the opposite side of the cuticle.
- Wait for the acrylic nude paint to dry and start applying black acrylic nail polish with your detail brush which has to have small and fine hairs to contour the mouse’s face.
- When you are done very patiently, make a line on the face to limit the expression of the eyes
- With a thin dotting tool and white acrylic nail polish you must make the eyes which can be guided by the video or with any image you have of Minnie.
- The mouse’s nose has to be done with a thin dotting with black acrylic enamel.
- The mouth is made with the detail brush which should only be seen at the corner
- With dotting you have to make the eyes with a black point
- You arrived at the moment of the bow that you have to use acrylic colored nail polish, to do it you have to make the center with a circle and then with the same dotting the part of the knot.
- Now you allow the red paint to dry, meanwhile making Minnie’s signature circular ear with black enamel.
- To make the white polka dots on the bun, wait for the red paint to dry and then apply with just points with the dotting and outline with black paint.
- To finish, make part of the other ear on the bun and you can paint the three tabs with a small eyeliner
- Finish with a nail fixer which prevents the decoration from being ruined and lasts longer for the girl.
As I explained before, you must make the character on a single nail to avoid overloading colors, then on the other nails you can paint red and only make white polka dots, starting a row in the middle of the polka dots and then on the sides.
Nail Designs for Girls of Hearts, Flowers, Rainbows, Bubbles, Frog, Cupcake, Clouds, Bears and Watermelon
Until now I have been explaining how to do nail decoration but with nail art tools which are not so expensive to get but many times you do not have the tools at hand.
And especially if you do not take the decoration as something professional for which I am going to teach you how to make all these designs that every girl likes because it gives a fashionable and chic touch to the hand.
Without a doubt these designs can be made by both small and large when you want to give a youthful touch to your nails.
It’s never too late to have fun and take out the girl inside you.
The flat brush is the typical nail brush that brings any type of nail polish that you buy.
It is very useful if you want to make a thick stroke and especially to make a base on the nail, that’s why it is ideal for painting your nails in a simple and fast way.
Then you can get nail brushes that are rounder and finer making it ideal for making more detailed strokes and ideal for nail art that you want to do without tools.
Depending on the brand of each enamel, the brush will be different, that is why it is always better to first make fine lines on a paper to test what type of thickness you can make and separate to know very well the decoration you are looking for.
How to make a cloud design for nails?
- It is really very simple what you should do with a light blue enamel is to first paint your nail to leave a base for the sky.
- Then you have to make small polka dots next to each other to make the clouds with white enamel.
- Gently rest the brush to make the desired effect but also leave space between the clouds.
If you want you can add stars, a sun, the moon or any fantasy decoration that you like so that the nails look beautiful and pretty.
How to make a cupcake design for nails?
These famous mini cakes that all children want to have on their birthday can now be carried in your hands to always look festive.
- The base of the cupcake has to be painted with red enamel on the end of the nail
- Once the red acrylic enamel dries, you can top it with some pink vertical lines.
- To make the cream of the cupcake what you have to do just like the clouds, you apply the brush making dots but larger on the red base.
- To finish you add the cherry at the top near the cuticle and inside the white enamel once you see that it is dry you can make some decoration with small dots with turquoise.
Always remember to finish applying enamel fixative so that your design lasts much longer.
In addition, if your nails last longer, your girl will take even more care of her hands and will not eat her nails, nor will she dirty them, since she will feel very elegant and beautiful in front of her friends.
How to make an animal print decoration for nails?
- To start, paint with a pink base that for me is the best combination that I could try and see.
- Then with an orange polish you have to make the spots that the leopard has and outline it with a black nail paint on around each spot.
This design is adorable if you like animals very much and want to look like them.
How to make nails decorated with hearts?
Ideal for princesses and romantics who like to decorate their fingers with hearts at every costume party.
Each style greatly depends on the personality of each girl, remember that some like to play mom, others to fantasy but there is always a time to be together.
This is very simple and easy is another way to make hearts in nail art.
- First I recommend putting a nude color base by tracing two curves from the outside of the nail to the center as if it were a love heart
- You let it dry and then apply the same process with the red color.
I always recommend practicing before on a sheet of paper simulating the size of the nail.
Keep in mind that since they are nail designs for girls, you have to have a small length distance, which you can practice with these models, since nail art for an adult woman with long nails is not the same as for short nails.
How to make nails decorated with flowers for girls?
This is the moment of flowers that girls like so much when spring begins and the flower party is held many times.
- To start you can make a base with a wide light blue brush.
- With small white lines as if it were a star you make the flower petals.
The amount of flowers you have to put in this case is 3 giving rise but you can also depending on the distance and size of the flower two or a large one that depends on how you like it.
If you want your flower to be a daisy then you can put an orange or yellow dot on it it will just look great as if you were a professional manicure.
How to make nail designs of a cute bear for girls?
- You have to start by making two dots with brown paint as if they were his ears.
- Then on the end of the nail you paint a circular half filled with the same color as if it were the face.
- Once the brown is dry you have to use a lighter shade and make the muzzle inside the half circle and a point on each ear.
- With the black enamel you make a point at the top of the muzzle to make the nose and eyes on each side.
It is undoubtedly a very cute animal that every little girl will want to have and remember her teddy bear.
How to make nail designs from a watermelon?
- Start by painting your nail with a dark red for the base which you already begin to give the first tone for your fruit.
- Paint a stripe on the end of the nail with white nail polish.
- Once you check that it is dry you apply a green tone on the white stripe leaving an upper white line uncovered.
- With the black enamel brush you make a few points in the smooth part of the red tone and ready the shape of watermelon you have it finished as if you were a professional manicure.
As you will notice nail art, practice, patience and creativity are essential.
Always a photo can serve you with something decorative that you think is very beautiful to carry in your hands.
For example, recently I made different decorations on my daughter’s nails with drawings of kittens, chicks, rabbits, ice cream, strawberries, sweets, cartoon characters, cartoon caricature that she always sees on television and the best thing was without having the necessary accessories for which creativity and inventiveness must always be present.
Looking for attractive drawings that you like and that seem beautiful, leaving a nice memory of childhood.
How to make nail decoration of a frog?
Makes this little animal is very simple considering that this animal is always represented by a children’s drawing such as the Pepe Toad, the Muppet Frog among many others.
- You have to choose a green nail polish and the first thing you have to do is the two eyes with two circles on each side of the nail ends.
- Next you make the face with a larger circle from the end of the nail joining the two points of the eyes and then let it dry.
- Once dry with white nail polish, make two circles inside the moles that you made the eyes.
- With black nail polish you have to make the mouth with a fine line which you should not press the brush and then with a small dot you make the iris of the eye.
How to make a girl’s rainbow nail decoration?
Since unicorns and rainbows became fashionable, more and more girls want to have their birthday themed with cakes, decorations and now is the time for nails.
- To start I recommend that you buy the seven colors of the rainbow to put with your nail polish each shade in a line next to each other vertically.
- The base of the nail must be a neutral color so that the rainbow makes more sense which I recommend you do on one or two fingers no more than that.
- You can make the lines from largest to smallest or the same height, all depending on the creativity and design you want to add.
How to make nail decoration with bubbles?
- You have to pass an enamel base that you do not have to let dry but remains damp
- With another color or shade of nail polish you add rubbery moles that you will see as they expand which will give an effect to bubbles
All these nail designs for girls you can also do on the feet with paint or apply gel nails since it is very easy and simple although it depends although the age of the girl depends a lot.
Unicorn Nail Decoration
A friend of mine saw that she had the unicorn design on one of her nails and I asked her how she made it so simple and I watch the following YouTube video.
With which he understood very well how to do it by following the steps but for that I will tell you how I did it and how beautiful they are so that all my friends then ask how they are done, you can read it in this article.
- As a first step you will apply a white base on the nail you want to make your unicorn
- The next step is with a detail brush and black paint you are going to make the ears as if it were a closed triangle at the bottom.
- With the help of a dotting tool you are going to make two circles that will be the eyes at the different ends of the nail. You have the alternative of using only a drop of enamel.
- You have to paint the inside of the ears with light pink again making another filled triangle.
- Between the ears and the eyes begin to make small flowers for that you have to make a very small point of pink and white next to each other and mix combining in a circular way.
- To make the unicorn’s eyelashes you have to do with the detail brush three curved lines that come out of the eyes.
- It is time to make the inner part of the eyes, for that what you have to do is white mole inside the black and then another smaller point to represent the tender look of the unicorn or horse
- With the top coat you finish the children’s nail art.
- But as a detail if you want you can glue an oval shiny stone to represent the horn so characteristic of this mythological and fantasy animal.
Images of Easy Nail Designs For Little Girls
little pigs

You can practice your designs in bottles before applying on the nails to be sure of what you do and have greater precision. (ademas es una buena manera de decorar bonito un elemento para el hogar)
Diseños de gatos, fijate que el gato puede hacerse en uñas de gel también.

caritas

chispas

cinta

Huellas. Para que te quede linda la uña puedes utilizar un poco la lima para darle forma.

pajaritos

Puedes hacerte la mejor pedicure haciendo estas figuras en las uñas del pie para el verano donde se usa sandalias es algo maravilloso que le gusta a los más pequeños.
Pollito

Decoración de Uñas Navideñas para Niñas
Para este caso en navidad muchas chicas quieren lucir sus uñas muy bonitas y decorativas con colores temáticos navideños como puede ser el negro, rojo y blanco.
Puedes utilizar para esto esmaltes no tóxicos o bien diseños con un pegamento adhesivo para pegar en la uña.

diseno unas navidad
Las pequeñas princesas aman esta fecha por la festividad por que puedes hacer desde arboles navideños, bolas decorativas, renos, regalos, santa claus y cientos de motivos que transmiten alegría y amor en este arte tan bonito.
Uñas cortas decoradas para niñas
Esta es una pregunta que me hacen ya que rara vez veremos una niña pequeña que tenga las uñas muy largas por lo cual todo tipo de modelo o figura que encuentres en este articulo puedes estar segura que se pueden realizar en uñas cortas.
Por lo cual comienza a obtener ideas y piensa como quieres que se vea la mano de tu hija para hacer un dibujo original, divertido y sobre todo entretenido para que todo sea un juego entre madre e hija en base al nailart
Nunca descuides los pies!
aunque a las pequeñas princesas les gusta verse las manos decoradas, los pies en época de verano es un factor crucial para estar arreglada y mostrarle a las amigas, principalmente por que se utiliza calzado descubierto y ademas es la temporada de piscina por el calor.
Intenta buscar diseños simples nada complicados al principio puedes compartir también en facebook o en twitter los que a ti te gustan.
O buscar nuevos diseños en pinterest o instagram que existe una amplia variedad aunque no tanto para niñas generalmente por lo cual te puedes ayudar basando en personajes de Disney que nunca fallan desde princesas hasta dibujos animados femeninos.
También te pueden interesar estos temas:
Women since we are children want to paint our nails because we like to copy our mother, aunt or grandmother who always see them as flirtatious and beautiful.
But since nail art became so popular nowadays more and more nail designs for girls They stand out more than many of them want to have their fingers personalized with different motifs.
In this article you will be able to find nail decoration for girls who want to wear their favorite cartoon character on their fingernails or those who like hearts, funny faces, monsters, butterflies, birds, fairies, animals like dogs, bears , cats, cow among many others.
The ears of Minnie Mouse painted on each nail where it gives a touch to the girls very feminine and in turn as an adult that they want to be playing.
The painted fruit shapes do not lose their mischief where the colors flow and with great intensity offer the fingers of the hand a new entertainment.
If you are a father or a mother who is very detailed about what your daughter puts in her hands, surely you asked yourself the question ever if
In this guide to nail designs for girls you will find:
Frequent questions: Is it healthy to paint your nails when you are a girl? – What enamels should be used to paint a girl’s nails? – At what age can a girl’s nails be painted?
Videos: Emoji Nail Decoration for Girls – Minnie Mouse Nail Decoration – Unicorn Nail Decoration
Step by Step Easy Nail Designs for Girls
Nail Art Decorations for Girls: Clouds – Cupcakes – Animal Print – Hearts – Flowers – Bear – Watermelon – Frog – Rainbow – Bubbles
Is it healthy to paint your nails when you are a girl?
As long as you take the pertinent precautions about what type of nail polish you use, it can be used as long as it is considered to be a game during a special day with the parents.
It happened to me that when my daughters asked me to paint their nails with enamel, I did not see it badly, but the father did not really like the idea and we began to investigate the effects that health problems can cause a girl who puts on enamel.
And the main problem is the components by which they are made, that’s why you always have to use recognized nail polish brands.
The big problem that pediatricians do not advise from childhood to use nail polish is because it can affect the growth and development of the minor if she eats her nails.
This was the case of one of my daughters who ate her nails and wanted to paint herself to play in the beauty salon.
That is why it must be understood that it must be supervised by the parents since it can be on the one hand that it bites the nails and damages its health, or the use of enamels that are less aggressive in their chemical composition.
But there is nothing wrong with the reality that your daughter wants to imitate mom by becoming older and always be a game.
It’s like when you put on your mother’s shoes to be able to look like her, she’s playing and that’s fine.
What is wrong is to paint the nails of small to go for a walk, a birthday or go to school since she is not yet the age to understand that touch of beauty in which as I mentioned above it has to be once a year to paint and not daily.
Remember that while it is a game you can wear from your necklaces to your shoes, want to make up in front of a mirror and use a lipstick because you are the reference and you see that you are very flirtatious.
Nail painting should be like a dress-up game, you have to make them understand that they are playing and that when they go to sleep it is important to clean up, leaving them clean, if you already explain that from the beginning that begins with this need to copy yourself then then it will have a beauty behavior.
What polishes should be used to paint a girl’s nails?
Always try to compare the non-toxic and the odorless (odorless) as adult enamel always has a very strong odor that can harm the nostrils.
Remember that nail polish is chemically developed to support adult skin but not for sensitive skin that girls have and then it can lead to an allergy, itching, or an irritation problem.
In toy stores or specialized beauty salons there are 100% enamels for girls that do not have as much chemical that is made up of dyes and water ensuring that it is not harmful to the health of the little girl and that it also has all the colors that fascinate her.
The enamels that girls should not use are the so-called toxic trio that are known as those with ingredients toluene, dibutyl phthalate Y formaldehyde.
On the one hand, toluene is a solvent that you find in gasoline or gasoline, so imagine that your little one has that in her hands and that if she eats her nails she would be terrible.
On the other hand is the formaldehyde It is a well-known carcinogen that will not act at the moment but may have future effects on your growth and health development.
And finally you find the dibutyl phthalate It is prohibited by the European Union for affecting the reproductive system of women and its development, which is why you are already aware of the consequences.
That is why many times parents act out of ignorance to see our daughter’s smile but always take the necessary precautions and any questions you have you can consult on the website of The Environmental Working Group where all kinds of beauty products are rated according to the toxicity of their ingredients.
This does not mean that girls can not paint their nails since if it were so, I would never make this article, but it is important that you know it to know what type of ingredient and paint you put on your daughter’s skin, that’s why I make these suggestions .
Many mothers asked me what type of enamels they can use so that their little girls or adolescents wear them that do not include those chemical compounds that do so much harm to health and that is why investigating and asking dermatologists recommended me.
Non-toxic enamels: Scotch Naturals, Honeybee Gardens WaterColors, Zoya, Butter London Y Piggy Paint.
These brands develop nail polishes that are especially developed for the skin and nail of a girl without contaminating chemical factors, if you got to know others you can name them in the comments so that all mothers are aware of it.
At what age can a girl’s nails be painted?
The age can vary depending on each girl and each mother.
It can begin at age 3 and up, but the interest must be borne by herself without the direct influence of an adult.
Remember that it has to be a game and not follow fashion trends or the influence of an advertisement, it is time to play make the mother that every girl always wants to follow the model and example that you are because you are her hero.
Step by Step Easy Nail Designs for Girls
I’m going to start by explaining the steps that are needed to achieve some decorated nail designs for children that you will surely like to have an idea and then reproduce on your little girl’s nails.
Later you will also find different ideas with thematic motifs of the designs that girls of different ages and in different seasons most seek so that you can have a variety as a source of inspiration when it comes to giving tenderness and love to the hands of your princess.
Always consider that the nails of girls are smaller than those of an adult woman so you will have less space to make the drawings and you must have more precision with the help of your model who puts her hand since she must stay still for a few minutes for the nail polish to not run.
How to make easy nail designs for girls
Here you can see how to use the yellow nail polish and a very original applique of an eye that moves to make the minions that you like the most.

In these seven steps he explains how you can make flowers especially the roses that are so beautiful on the nails for both adult women and girls.

You can not miss the design of the cow that is very easy to do with a white base and black dots and its pink snout that gives a lot of tenderness.

Can you imagine making yourself a fun and original shoe lace nail decoration?

Stripes and abstract geometric figures can never be missing in a nail model where gold is the one that stands out the most.

My little girl loves puzzles and I found an easy, fun, and quick way to make different colors in paints.

I like this bunny very much because it is very tender among the animals that you can do to your daughter in four steps.

If you like the pink color on your nails then the little pig can not miss with some polka dots in different ranges and pink shades.

Being elegant is always very beautiful but the best thing is to know how to make a bow as if you had a suit and wear all the elegance for a party.

Step by Step the best fruit designs, if you look closely you can make from an apple, kiwi and watermelon among many others. It will go from being simple to very striking nails.

A small design for short nails of a panda bear very fashionable for nail art. Once you practice it you can do it quickly.

Nail decorated with a very beautiful giraffe that has a lot of detail but can be an excellent idea for long nails.

If you want to learn how to make animals step by step on your nails, it is now very easy since you can see all the steps from the base to assemble the silhouette and its model with dots and dots. They are very fun and stylish.

The fruit models to decorate the nails and hands of the girls is something that they always like for their freshness and especially the cheerful colors and this is the case of watermelon.

All the steps to make pink flowers with a pastel green base.

A white polar bear with some shiny stones is the proposal to learn in this visual tutorial using simple steps.

Many times you do not have all the tools to make your nail designs but that is why

Nails decorated with small dots in shades of white, gray, black where a kind of snowfall is made with an ultra fine brush.

Stickers and stripes are a good combination to make straight figures in different bright shades. It is very beautiful and can be done quietly at home.

Emoji Nail Decoration for Girls
- To start doing this type of design, what you should do is paint your nails with a pastel yellow nail polish base.
- You let it dry and give it a second layer of pastel yellow to make it look more intense, always paint from the part of the cuticle towards the end of the nail.
- Now you should use a short handle detail brush, dottings tools and acrylic nail art paint.
- With the dotting and neon orange paint you make two points at each end to then make a heart on each side which would be the eyes of your emoji
- To make the heart is simple, you just have to join the two points made with the same dotting tool that you did the two points.
- With black enamel paint what you have to do is the mouth which you do with the short handle detail brush, which with it serves to fill the smiling mouth.
- To finish use the top coat to brighten your design and protect the decoration of your first emoji.
Now I will explain how to make another funny emoticon face for your nails.
- You will start by outlining the mouth with the black paint with your short-handled detail brush, then limit the area of the teeth with a black line in the middle.
- At the bottom you fill it with black enamel.
- The next step is to make two arches so that it is shaped like eyes and then the eyebrows on them in the same way but leaning more on the side of the nail.
- Now is the time to fill the mouth on the top with white nail polish to simulate the teeth of the emoji.
- With the light blue enamel you have to make the tears of laughter so characteristic of this chat character.
- Now outline the tears with a shade of blue that is darker and your design will look wonderful.
- It is time to apply the top coat so that it is fixed and you do not lose the design of this so funny emoji.
The next happy face is very striking because it will cry from laughter much louder
- To start with a fine brush to make the details you make the eyes and the eyebrows as I explained previously with two arches in dark color.
- With the blue or light blue paint you have to make lines as if it were a waterfall that comes out of the eye to the tip of the nail.
- To make the mouth you have to do it with black enamel but this time in the shape of a circle as if surprised.
- You divide it in two with a horizontal line in the middle and paint the bottom with black paint and white with the top.
- With a darker shade of blue you make the edge of prolonged crying on your emoji.
- To finish as always I recommend the top coat for a matter that will last much longer your elaborate design.
Now this emoji is the one that winks at you and that both princesses and adult women like.
- You have to use the dotting tools with black enamel to make a circle on one side as if it were a very large eye
- With the detail brush you make the other eye closed as if it were a slightly more squashed arch.
- Now with the dotting you have to make another point but with white enamel on the previous circle filled in black, making a white mole on the black.
- To make the mouth, you just make a smile line and with a red nail polish you make the tongue come out of it.
- Where you then fill the rest of the mouth and paint it all black, filling the red tongue.
- On the white mole you have to add a black dotting
This is the last emoji that is the chocolate ice cream flake or you can think of something else that became so popular because of its shape.
- For this you will have to use brown enamel making the base and fill it with your detail brush
- You do the same as before but narrower to make the shape look like a pyramid but encompassed.
- The upper part has to be pointed, you can be guided with an image in case you have any questions.
- Once it dries you have to do the mouth and eyes with white nail polish.
- You wait for the white nail polish to dry and now with the small brush you make a small black dot on the white mole.
- To finish, give it shine with the top coat.
Minnie Mouse Nail Decoration
If there is a Disney character that he likes all girls, it is undoubtedly the mouse Mickey’s girlfriend, the most popular cartoon character in the world.
Her characteristic bow and ears are a symbol that can be reproduced in a nail art design for girls that you will surely like very much and that you can then follow each step in this video.
Remember that all the steps you can read but also see in the Youtube videos that I was collecting so that you have a nice tutorial to practice and do with your daughter, goddaughter, granddaughter or niece who wants to paint her nails in a fun and entertaining way .
What this little mouse has is that it is a very fashionable character and she always likes to be fashionable although her white polka dot dress can always be seen with that red background color and is the one that we are going to reproduce on the nails.
You can do it in one or in several, try not to overload with the same drawing since it can saturate the hand with hues.
- You start by putting makeup on your nails with a nude color and you have to qualify it so that you can later make the Minnie Mouse design.
- With the dotting tool you start applying acrylic paint in a semi circle which must have a skin color very similar to the base tone but you will notice that it is somewhat brighter. Apply to the middle part starting at the end of the nail on the opposite side of the cuticle.
- Wait for the acrylic nude paint to dry and start applying black acrylic nail polish with your detail brush which has to have small and fine hairs to contour the mouse’s face.
- When you are done very patiently, make a line on the face to limit the expression of the eyes
- With a thin dotting tool and white acrylic nail polish you must make the eyes which can be guided by the video or with any image you have of Minnie.
- The mouse’s nose has to be done with a thin dotting with black acrylic enamel.
- The mouth is made with the detail brush which should only be seen at the corner
- With dotting you have to make the eyes with a black point
- You arrived at the moment of the bow that you have to use acrylic colored nail polish, to do it you have to make the center with a circle and then with the same dotting the part of the knot.
- Now you allow the red paint to dry, meanwhile making Minnie’s signature circular ear with black enamel.
- To make the white polka dots on the bun, wait for the red paint to dry and then apply with just points with the dotting and outline with black paint.
- To finish, make part of the other ear on the bun and you can paint the three tabs with a small eyeliner
- Finish with a nail fixer which prevents the decoration from being ruined and lasts longer for the girl.
As I explained before, you must make the character on a single nail to avoid overloading colors, then on the other nails you can paint red and only make white polka dots, starting a row in the middle of the polka dots and then on the sides.
Nail Designs for Girls of Hearts, Flowers, Rainbows, Bubbles, Frog, Cupcake, Clouds, Bears and Watermelon
Until now I have been explaining how to do nail decoration but with nail art tools which are not so expensive to get but many times you do not have the tools at hand.
And especially if you do not take the decoration as something professional for which I am going to teach you how to make all these designs that every girl likes because it gives a fashionable and chic touch to the hand.
Without a doubt these designs can be made by both small and large when you want to give a youthful touch to your nails.
It’s never too late to have fun and take out the girl inside you.
The flat brush is the typical nail brush that brings any type of nail polish that you buy.
It is very useful if you want to make a thick stroke and especially to make a base on the nail, that’s why it is ideal for painting your nails in a simple and fast way.
Then you can get nail brushes that are rounder and finer making it ideal for making more detailed strokes and ideal for nail art that you want to do without tools.
Depending on the brand of each enamel, the brush will be different, that is why it is always better to first make fine lines on a paper to test what type of thickness you can make and separate to know very well the decoration you are looking for.
How to make a cloud design for nails?
- It is really very simple what you should do with a light blue enamel is to first paint your nail to leave a base for the sky.
- Then you have to make small polka dots next to each other to make the clouds with white enamel.
- Gently rest the brush to make the desired effect but also leave space between the clouds.
If you want you can add stars, a sun, the moon or any fantasy decoration that you like so that the nails look beautiful and pretty.
How to make a cupcake design for nails?
These famous mini cakes that all children want to have on their birthday can now be carried in your hands to always look festive.
- The base of the cupcake has to be painted with red enamel on the end of the nail
- Once the red acrylic enamel dries, you can top it with some pink vertical lines.
- To make the cream of the cupcake what you have to do just like the clouds, you apply the brush making dots but larger on the red base.
- To finish you add the cherry at the top near the cuticle and inside the white enamel once you see that it is dry you can make some decoration with small dots with turquoise.
Always remember to finish applying enamel fixative so that your design lasts much longer.
In addition, if your nails last longer, your girl will take even more care of her hands and will not eat her nails, nor will she dirty them, since she will feel very elegant and beautiful in front of her friends.
How to make an animal print decoration for nails?
- To start, paint with a pink base that for me is the best combination that I could try and see.
- Then with an orange polish you have to make the spots that the leopard has and outline it with a black nail paint on around each spot.
This design is adorable if you like animals very much and want to look like them.
How to make nails decorated with hearts?
Ideal for princesses and romantics who like to decorate their fingers with hearts at every costume party.
Each style greatly depends on the personality of each girl, remember that some like to play mom, others to fantasy but there is always a time to be together.
This is very simple and easy is another way to make hearts in nail art.
- First I recommend putting a nude color base by tracing two curves from the outside of the nail to the center as if it were a love heart
- You let it dry and then apply the same process with the red color.
I always recommend practicing before on a sheet of paper simulating the size of the nail.
Keep in mind that since they are nail designs for girls, you have to have a small length distance, which you can practice with these models, since nail art for an adult woman with long nails is not the same as for short nails.
How to make nails decorated with flowers for girls?
This is the moment of flowers that girls like so much when spring begins and the flower party is held many times.
- To start you can make a base with a wide light blue brush.
- With small white lines as if it were a star you make the flower petals.
The amount of flowers you have to put in this case is 3 giving rise but you can also depending on the distance and size of the flower two or a large one that depends on how you like it.
If you want your flower to be a daisy then you can put an orange or yellow dot on it it will just look great as if you were a professional manicure.
How to make nail designs of a cute bear for girls?
- You have to start by making two dots with brown paint as if they were his ears.
- Then on the end of the nail you paint a circular half filled with the same color as if it were the face.
- Once the brown is dry you have to use a lighter shade and make the muzzle inside the half circle and a point on each ear.
- With the black enamel you make a point at the top of the muzzle to make the nose and eyes on each side.
It is undoubtedly a very cute animal that every little girl will want to have and remember her teddy bear.
How to make nail designs from a watermelon?
- Start by painting your nail with a dark red for the base which you already begin to give the first tone for your fruit.
- Paint a stripe on the end of the nail with white nail polish.
- Once you check that it is dry you apply a green tone on the white stripe leaving an upper white line uncovered.
- With the black enamel brush you make a few points in the smooth part of the red tone and ready the shape of watermelon you have it finished as if you were a professional manicure.
As you will notice nail art, practice, patience and creativity are essential.
Always a photo can serve you with something decorative that you think is very beautiful to carry in your hands.
For example, recently I made different decorations on my daughter’s nails with drawings of kittens, chicks, rabbits, ice cream, strawberries, sweets, cartoon characters, cartoon caricature that she always sees on television and the best thing was without having the necessary accessories for which creativity and inventiveness must always be present.
Looking for attractive drawings that you like and that seem beautiful, leaving a nice memory of childhood.
How to make nail decoration of a frog?
Makes this little animal is very simple considering that this animal is always represented by a children’s drawing such as the Pepe Toad, the Muppet Frog among many others.
- You have to choose a green nail polish and the first thing you have to do is the two eyes with two circles on each side of the nail ends.
- Next you make the face with a larger circle from the end of the nail joining the two points of the eyes and then let it dry.
- Once dry with white nail polish, make two circles inside the moles that you made the eyes.
- With black nail polish you have to make the mouth with a fine line which you should not press the brush and then with a small dot you make the iris of the eye.
How to make a girl’s rainbow nail decoration?
Since unicorns and rainbows became fashionable, more and more girls want to have their birthday themed with cakes, decorations and now is the time for nails.
- To start I recommend that you buy the seven colors of the rainbow to put with your nail polish each shade in a line next to each other vertically.
- The base of the nail must be a neutral color so that the rainbow makes more sense which I recommend you do on one or two fingers no more than that.
- You can make the lines from largest to smallest or the same height, all depending on the creativity and design you want to add.
How to make nail decoration with bubbles?
- You have to pass an enamel base that you do not have to let dry but remains damp
- With another color or shade of nail polish you add rubbery moles that you will see as they expand which will give an effect to bubbles
All these nail designs for girls you can also do on the feet with paint or apply gel nails since it is very easy and simple although it depends although the age of the girl depends a lot.
Unicorn Nail Decoration
A friend of mine saw that she had the unicorn design on one of her nails and I asked her how she made it so simple and I watch the following YouTube video.
With which he understood very well how to do it by following the steps but for that I will tell you how I did it and how beautiful they are so that all my friends then ask how they are done, you can read it in this article.
- As a first step you will apply a white base on the nail you want to make your unicorn
- The next step is with a detail brush and black paint you are going to make the ears as if it were a closed triangle at the bottom.
- With the help of a dotting tool you are going to make two circles that will be the eyes at the different ends of the nail. You have the alternative of using only a drop of enamel.
- You have to paint the inside of the ears with light pink again making another filled triangle.
- Between the ears and the eyes begin to make small flowers for that you have to make a very small point of pink and white next to each other and mix combining in a circular way.
- To make the unicorn’s eyelashes you have to do with the detail brush three curved lines that come out of the eyes.
- It is time to make the inner part of the eyes, for that what you have to do is white mole inside the black and then another smaller point to represent the tender look of the unicorn or horse
- With the top coat you finish the children’s nail art.
- But as a detail if you want you can glue an oval shiny stone to represent the horn so characteristic of this mythological and fantasy animal.
Images of Easy Nail Designs For Little Girls
little pigs

You can practice your designs in bottles before applying on the nails to be sure of what you do and have greater precision. (ademas es una buena manera de decorar bonito un elemento para el hogar)
Diseños de gatos, fijate que el gato puede hacerse en uñas de gel también.

caritas

chispas

cinta

Huellas. Para que te quede linda la uña puedes utilizar un poco la lima para darle forma.

pajaritos

Puedes hacerte la mejor pedicure haciendo estas figuras en las uñas del pie para el verano donde se usa sandalias es algo maravilloso que le gusta a los más pequeños.
Pollito

Decoración de Uñas Navideñas para Niñas
Para este caso en navidad muchas chicas quieren lucir sus uñas muy bonitas y decorativas con colores temáticos navideños como puede ser el negro, rojo y blanco.
Puedes utilizar para esto esmaltes no tóxicos o bien diseños con un pegamento adhesivo para pegar en la uña.

diseno unas navidad
Las pequeñas princesas aman esta fecha por la festividad por que puedes hacer desde arboles navideños, bolas decorativas, renos, regalos, santa claus y cientos de motivos que transmiten alegría y amor en este arte tan bonito.
Uñas cortas decoradas para niñas
Esta es una pregunta que me hacen ya que rara vez veremos una niña pequeña que tenga las uñas muy largas por lo cual todo tipo de modelo o figura que encuentres en este articulo puedes estar segura que se pueden realizar en uñas cortas.
Por lo cual comienza a obtener ideas y piensa como quieres que se vea la mano de tu hija para hacer un dibujo original, divertido y sobre todo entretenido para que todo sea un juego entre madre e hija en base al nailart
Nunca descuides los pies!
aunque a las pequeñas princesas les gusta verse las manos decoradas, los pies en época de verano es un factor crucial para estar arreglada y mostrarle a las amigas, principalmente por que se utiliza calzado descubierto y ademas es la temporada de piscina por el calor.
Intenta buscar diseños simples nada complicados al principio puedes compartir también en facebook o en twitter los que a ti te gustan.
O buscar nuevos diseños en pinterest o instagram que existe una amplia variedad aunque no tanto para niñas generalmente por lo cual te puedes ayudar basando en personajes de Disney que nunca fallan desde princesas hasta dibujos animados femeninos.
También te pueden interesar estos temas:
Women since we are children want to paint our nails because we like to copy our mother, aunt or grandmother who always see them as flirtatious and beautiful.
But since nail art became so popular nowadays more and more nail designs for girls They stand out more than many of them want to have their fingers personalized with different motifs.
In this article you will be able to find nail decoration for girls who want to wear their favorite cartoon character on their fingernails or those who like hearts, funny faces, monsters, butterflies, birds, fairies, animals like dogs, bears , cats, cow among many others.
The ears of Minnie Mouse painted on each nail where it gives a touch to the girls very feminine and in turn as an adult that they want to be playing.
The painted fruit shapes do not lose their mischief where the colors flow and with great intensity offer the fingers of the hand a new entertainment.
If you are a father or a mother who is very detailed about what your daughter puts in her hands, surely you asked yourself the question ever if
In this guide to nail designs for girls you will find:
Frequent questions: Is it healthy to paint your nails when you are a girl? – What enamels should be used to paint a girl’s nails? – At what age can a girl’s nails be painted?
Videos: Emoji Nail Decoration for Girls – Minnie Mouse Nail Decoration – Unicorn Nail Decoration
Step by Step Easy Nail Designs for Girls
Nail Art Decorations for Girls: Clouds – Cupcakes – Animal Print – Hearts – Flowers – Bear – Watermelon – Frog – Rainbow – Bubbles
Is it healthy to paint your nails when you are a girl?
As long as you take the pertinent precautions about what type of nail polish you use, it can be used as long as it is considered to be a game during a special day with the parents.
It happened to me that when my daughters asked me to paint their nails with enamel, I did not see it badly, but the father did not really like the idea and we began to investigate the effects that health problems can cause a girl who puts on enamel.
And the main problem is the components by which they are made, that’s why you always have to use recognized nail polish brands.
The big problem that pediatricians do not advise from childhood to use nail polish is because it can affect the growth and development of the minor if she eats her nails.
This was the case of one of my daughters who ate her nails and wanted to paint herself to play in the beauty salon.
That is why it must be understood that it must be supervised by the parents since it can be on the one hand that it bites the nails and damages its health, or the use of enamels that are less aggressive in their chemical composition.
But there is nothing wrong with the reality that your daughter wants to imitate mom by becoming older and always be a game.
It’s like when you put on your mother’s shoes to be able to look like her, she’s playing and that’s fine.
What is wrong is to paint the nails of small to go for a walk, a birthday or go to school since she is not yet the age to understand that touch of beauty in which as I mentioned above it has to be once a year to paint and not daily.
Remember that while it is a game you can wear from your necklaces to your shoes, want to make up in front of a mirror and use a lipstick because you are the reference and you see that you are very flirtatious.
Nail painting should be like a dress-up game, you have to make them understand that they are playing and that when they go to sleep it is important to clean up, leaving them clean, if you already explain that from the beginning that begins with this need to copy yourself then then it will have a beauty behavior.
What polishes should be used to paint a girl’s nails?
Always try to compare the non-toxic and the odorless (odorless) as adult enamel always has a very strong odor that can harm the nostrils.
Remember that nail polish is chemically developed to support adult skin but not for sensitive skin that girls have and then it can lead to an allergy, itching, or an irritation problem.
In toy stores or specialized beauty salons there are 100% enamels for girls that do not have as much chemical that is made up of dyes and water ensuring that it is not harmful to the health of the little girl and that it also has all the colors that fascinate her.
The enamels that girls should not use are the so-called toxic trio that are known as those with ingredients toluene, dibutyl phthalate Y formaldehyde.
On the one hand, toluene is a solvent that you find in gasoline or gasoline, so imagine that your little one has that in her hands and that if she eats her nails she would be terrible.
On the other hand is the formaldehyde It is a well-known carcinogen that will not act at the moment but may have future effects on your growth and health development.
And finally you find the dibutyl phthalate It is prohibited by the European Union for affecting the reproductive system of women and its development, which is why you are already aware of the consequences.
That is why many times parents act out of ignorance to see our daughter’s smile but always take the necessary precautions and any questions you have you can consult on the website of The Environmental Working Group where all kinds of beauty products are rated according to the toxicity of their ingredients.
This does not mean that girls can not paint their nails since if it were so, I would never make this article, but it is important that you know it to know what type of ingredient and paint you put on your daughter’s skin, that’s why I make these suggestions .
Many mothers asked me what type of enamels they can use so that their little girls or adolescents wear them that do not include those chemical compounds that do so much harm to health and that is why investigating and asking dermatologists recommended me.
Non-toxic enamels: Scotch Naturals, Honeybee Gardens WaterColors, Zoya, Butter London Y Piggy Paint.
These brands develop nail polishes that are especially developed for the skin and nail of a girl without contaminating chemical factors, if you got to know others you can name them in the comments so that all mothers are aware of it.
At what age can a girl’s nails be painted?
The age can vary depending on each girl and each mother.
It can begin at age 3 and up, but the interest must be borne by herself without the direct influence of an adult.
Remember that it has to be a game and not follow fashion trends or the influence of an advertisement, it is time to play make the mother that every girl always wants to follow the model and example that you are because you are her hero.
Step by Step Easy Nail Designs for Girls
I’m going to start by explaining the steps that are needed to achieve some decorated nail designs for children that you will surely like to have an idea and then reproduce on your little girl’s nails.
Later you will also find different ideas with thematic motifs of the designs that girls of different ages and in different seasons most seek so that you can have a variety as a source of inspiration when it comes to giving tenderness and love to the hands of your princess.
Always consider that the nails of girls are smaller than those of an adult woman so you will have less space to make the drawings and you must have more precision with the help of your model who puts her hand since she must stay still for a few minutes for the nail polish to not run.
How to make easy nail designs for girls
Here you can see how to use the yellow nail polish and a very original applique of an eye that moves to make the minions that you like the most.

In these seven steps he explains how you can make flowers especially the roses that are so beautiful on the nails for both adult women and girls.

You can not miss the design of the cow that is very easy to do with a white base and black dots and its pink snout that gives a lot of tenderness.

Can you imagine making yourself a fun and original shoe lace nail decoration?

Stripes and abstract geometric figures can never be missing in a nail model where gold is the one that stands out the most.

My little girl loves puzzles and I found an easy, fun, and quick way to make different colors in paints.

I like this bunny very much because it is very tender among the animals that you can do to your daughter in four steps.

If you like the pink color on your nails then the little pig can not miss with some polka dots in different ranges and pink shades.

Being elegant is always very beautiful but the best thing is to know how to make a bow as if you had a suit and wear all the elegance for a party.

Step by Step the best fruit designs, if you look closely you can make from an apple, kiwi and watermelon among many others. It will go from being simple to very striking nails.

A small design for short nails of a panda bear very fashionable for nail art. Once you practice it you can do it quickly.

Nail decorated with a very beautiful giraffe that has a lot of detail but can be an excellent idea for long nails.

If you want to learn how to make animals step by step on your nails, it is now very easy since you can see all the steps from the base to assemble the silhouette and its model with dots and dots. They are very fun and stylish.

The fruit models to decorate the nails and hands of the girls is something that they always like for their freshness and especially the cheerful colors and this is the case of watermelon.

All the steps to make pink flowers with a pastel green base.

A white polar bear with some shiny stones is the proposal to learn in this visual tutorial using simple steps.

Many times you do not have all the tools to make your nail designs but that is why

Nails decorated with small dots in shades of white, gray, black where a kind of snowfall is made with an ultra fine brush.

Stickers and stripes are a good combination to make straight figures in different bright shades. It is very beautiful and can be done quietly at home.

Emoji Nail Decoration for Girls
- To start doing this type of design, what you should do is paint your nails with a pastel yellow nail polish base.
- You let it dry and give it a second layer of pastel yellow to make it look more intense, always paint from the part of the cuticle towards the end of the nail.
- Now you should use a short handle detail brush, dottings tools and acrylic nail art paint.
- With the dotting and neon orange paint you make two points at each end to then make a heart on each side which would be the eyes of your emoji
- To make the heart is simple, you just have to join the two points made with the same dotting tool that you did the two points.
- With black enamel paint what you have to do is the mouth which you do with the short handle detail brush, which with it serves to fill the smiling mouth.
- To finish use the top coat to brighten your design and protect the decoration of your first emoji.
Now I will explain how to make another funny emoticon face for your nails.
- You will start by outlining the mouth with the black paint with your short-handled detail brush, then limit the area of the teeth with a black line in the middle.
- At the bottom you fill it with black enamel.
- The next step is to make two arches so that it is shaped like eyes and then the eyebrows on them in the same way but leaning more on the side of the nail.
- Now is the time to fill the mouth on the top with white nail polish to simulate the teeth of the emoji.
- With the light blue enamel you have to make the tears of laughter so characteristic of this chat character.
- Now outline the tears with a shade of blue that is darker and your design will look wonderful.
- It is time to apply the top coat so that it is fixed and you do not lose the design of this so funny emoji.
The next happy face is very striking because it will cry from laughter much louder
- To start with a fine brush to make the details you make the eyes and the eyebrows as I explained previously with two arches in dark color.
- With the blue or light blue paint you have to make lines as if it were a waterfall that comes out of the eye to the tip of the nail.
- To make the mouth you have to do it with black enamel but this time in the shape of a circle as if surprised.
- You divide it in two with a horizontal line in the middle and paint the bottom with black paint and white with the top.
- With a darker shade of blue you make the edge of prolonged crying on your emoji.
- To finish as always I recommend the top coat for a matter that will last much longer your elaborate design.
Now this emoji is the one that winks at you and that both princesses and adult women like.
- You have to use the dotting tools with black enamel to make a circle on one side as if it were a very large eye
- With the detail brush you make the other eye closed as if it were a slightly more squashed arch.
- Now with the dotting you have to make another point but with white enamel on the previous circle filled in black, making a white mole on the black.
- To make the mouth, you just make a smile line and with a red nail polish you make the tongue come out of it.
- Where you then fill the rest of the mouth and paint it all black, filling the red tongue.
- On the white mole you have to add a black dotting
This is the last emoji that is the chocolate ice cream flake or you can think of something else that became so popular because of its shape.
- For this you will have to use brown enamel making the base and fill it with your detail brush
- You do the same as before but narrower to make the shape look like a pyramid but encompassed.
- The upper part has to be pointed, you can be guided with an image in case you have any questions.
- Once it dries you have to do the mouth and eyes with white nail polish.
- You wait for the white nail polish to dry and now with the small brush you make a small black dot on the white mole.
- To finish, give it shine with the top coat.
Minnie Mouse Nail Decoration
If there is a Disney character that he likes all girls, it is undoubtedly the mouse Mickey’s girlfriend, the most popular cartoon character in the world.
Her characteristic bow and ears are a symbol that can be reproduced in a nail art design for girls that you will surely like very much and that you can then follow each step in this video.
Remember that all the steps you can read but also see in the Youtube videos that I was collecting so that you have a nice tutorial to practice and do with your daughter, goddaughter, granddaughter or niece who wants to paint her nails in a fun and entertaining way .
What this little mouse has is that it is a very fashionable character and she always likes to be fashionable although her white polka dot dress can always be seen with that red background color and is the one that we are going to reproduce on the nails.
You can do it in one or in several, try not to overload with the same drawing since it can saturate the hand with hues.
- You start by putting makeup on your nails with a nude color and you have to qualify it so that you can later make the Minnie Mouse design.
- With the dotting tool you start applying acrylic paint in a semi circle which must have a skin color very similar to the base tone but you will notice that it is somewhat brighter. Apply to the middle part starting at the end of the nail on the opposite side of the cuticle.
- Wait for the acrylic nude paint to dry and start applying black acrylic nail polish with your detail brush which has to have small and fine hairs to contour the mouse’s face.
- When you are done very patiently, make a line on the face to limit the expression of the eyes
- With a thin dotting tool and white acrylic nail polish you must make the eyes which can be guided by the video or with any image you have of Minnie.
- The mouse’s nose has to be done with a thin dotting with black acrylic enamel.
- The mouth is made with the detail brush which should only be seen at the corner
- With dotting you have to make the eyes with a black point
- You arrived at the moment of the bow that you have to use acrylic colored nail polish, to do it you have to make the center with a circle and then with the same dotting the part of the knot.
- Now you allow the red paint to dry, meanwhile making Minnie’s signature circular ear with black enamel.
- To make the white polka dots on the bun, wait for the red paint to dry and then apply with just points with the dotting and outline with black paint.
- To finish, make part of the other ear on the bun and you can paint the three tabs with a small eyeliner
- Finish with a nail fixer which prevents the decoration from being ruined and lasts longer for the girl.
As I explained before, you must make the character on a single nail to avoid overloading colors, then on the other nails you can paint red and only make white polka dots, starting a row in the middle of the polka dots and then on the sides.
Nail Designs for Girls of Hearts, Flowers, Rainbows, Bubbles, Frog, Cupcake, Clouds, Bears and Watermelon
Until now I have been explaining how to do nail decoration but with nail art tools which are not so expensive to get but many times you do not have the tools at hand.
And especially if you do not take the decoration as something professional for which I am going to teach you how to make all these designs that every girl likes because it gives a fashionable and chic touch to the hand.
Without a doubt these designs can be made by both small and large when you want to give a youthful touch to your nails.
It’s never too late to have fun and take out the girl inside you.
The flat brush is the typical nail brush that brings any type of nail polish that you buy.
It is very useful if you want to make a thick stroke and especially to make a base on the nail, that’s why it is ideal for painting your nails in a simple and fast way.
Then you can get nail brushes that are rounder and finer making it ideal for making more detailed strokes and ideal for nail art that you want to do without tools.
Depending on the brand of each enamel, the brush will be different, that is why it is always better to first make fine lines on a paper to test what type of thickness you can make and separate to know very well the decoration you are looking for.
How to make a cloud design for nails?
- It is really very simple what you should do with a light blue enamel is to first paint your nail to leave a base for the sky.
- Then you have to make small polka dots next to each other to make the clouds with white enamel.
- Gently rest the brush to make the desired effect but also leave space between the clouds.
If you want you can add stars, a sun, the moon or any fantasy decoration that you like so that the nails look beautiful and pretty.
How to make a cupcake design for nails?
These famous mini cakes that all children want to have on their birthday can now be carried in your hands to always look festive.
- The base of the cupcake has to be painted with red enamel on the end of the nail
- Once the red acrylic enamel dries, you can top it with some pink vertical lines.
- To make the cream of the cupcake what you have to do just like the clouds, you apply the brush making dots but larger on the red base.
- To finish you add the cherry at the top near the cuticle and inside the white enamel once you see that it is dry you can make some decoration with small dots with turquoise.
Always remember to finish applying enamel fixative so that your design lasts much longer.
In addition, if your nails last longer, your girl will take even more care of her hands and will not eat her nails, nor will she dirty them, since she will feel very elegant and beautiful in front of her friends.
How to make an animal print decoration for nails?
- To start, paint with a pink base that for me is the best combination that I could try and see.
- Then with an orange polish you have to make the spots that the leopard has and outline it with a black nail paint on around each spot.
This design is adorable if you like animals very much and want to look like them.
How to make nails decorated with hearts?
Ideal for princesses and romantics who like to decorate their fingers with hearts at every costume party.
Each style greatly depends on the personality of each girl, remember that some like to play mom, others to fantasy but there is always a time to be together.
This is very simple and easy is another way to make hearts in nail art.
- First I recommend putting a nude color base by tracing two curves from the outside of the nail to the center as if it were a love heart
- You let it dry and then apply the same process with the red color.
I always recommend practicing before on a sheet of paper simulating the size of the nail.
Keep in mind that since they are nail designs for girls, you have to have a small length distance, which you can practice with these models, since nail art for an adult woman with long nails is not the same as for short nails.
How to make nails decorated with flowers for girls?
This is the moment of flowers that girls like so much when spring begins and the flower party is held many times.
- To start you can make a base with a wide light blue brush.
- With small white lines as if it were a star you make the flower petals.
The amount of flowers you have to put in this case is 3 giving rise but you can also depending on the distance and size of the flower two or a large one that depends on how you like it.
If you want your flower to be a daisy then you can put an orange or yellow dot on it it will just look great as if you were a professional manicure.
How to make nail designs of a cute bear for girls?
- You have to start by making two dots with brown paint as if they were his ears.
- Then on the end of the nail you paint a circular half filled with the same color as if it were the face.
- Once the brown is dry you have to use a lighter shade and make the muzzle inside the half circle and a point on each ear.
- With the black enamel you make a point at the top of the muzzle to make the nose and eyes on each side.
It is undoubtedly a very cute animal that every little girl will want to have and remember her teddy bear.
How to make nail designs from a watermelon?
- Start by painting your nail with a dark red for the base which you already begin to give the first tone for your fruit.
- Paint a stripe on the end of the nail with white nail polish.
- Once you check that it is dry you apply a green tone on the white stripe leaving an upper white line uncovered.
- With the black enamel brush you make a few points in the smooth part of the red tone and ready the shape of watermelon you have it finished as if you were a professional manicure.
As you will notice nail art, practice, patience and creativity are essential.
Always a photo can serve you with something decorative that you think is very beautiful to carry in your hands.
For example, recently I made different decorations on my daughter’s nails with drawings of kittens, chicks, rabbits, ice cream, strawberries, sweets, cartoon characters, cartoon caricature that she always sees on television and the best thing was without having the necessary accessories for which creativity and inventiveness must always be present.
Looking for attractive drawings that you like and that seem beautiful, leaving a nice memory of childhood.
How to make nail decoration of a frog?
Makes this little animal is very simple considering that this animal is always represented by a children’s drawing such as the Pepe Toad, the Muppet Frog among many others.
- You have to choose a green nail polish and the first thing you have to do is the two eyes with two circles on each side of the nail ends.
- Next you make the face with a larger circle from the end of the nail joining the two points of the eyes and then let it dry.
- Once dry with white nail polish, make two circles inside the moles that you made the eyes.
- With black nail polish you have to make the mouth with a fine line which you should not press the brush and then with a small dot you make the iris of the eye.
How to make a girl’s rainbow nail decoration?
Since unicorns and rainbows became fashionable, more and more girls want to have their birthday themed with cakes, decorations and now is the time for nails.
- To start I recommend that you buy the seven colors of the rainbow to put with your nail polish each shade in a line next to each other vertically.
- The base of the nail must be a neutral color so that the rainbow makes more sense which I recommend you do on one or two fingers no more than that.
- You can make the lines from largest to smallest or the same height, all depending on the creativity and design you want to add.
How to make nail decoration with bubbles?
- You have to pass an enamel base that you do not have to let dry but remains damp
- With another color or shade of nail polish you add rubbery moles that you will see as they expand which will give an effect to bubbles
All these nail designs for girls you can also do on the feet with paint or apply gel nails since it is very easy and simple although it depends although the age of the girl depends a lot.
Unicorn Nail Decoration
A friend of mine saw that she had the unicorn design on one of her nails and I asked her how she made it so simple and I watch the following YouTube video.
With which he understood very well how to do it by following the steps but for that I will tell you how I did it and how beautiful they are so that all my friends then ask how they are done, you can read it in this article.
- As a first step you will apply a white base on the nail you want to make your unicorn
- The next step is with a detail brush and black paint you are going to make the ears as if it were a closed triangle at the bottom.
- With the help of a dotting tool you are going to make two circles that will be the eyes at the different ends of the nail. You have the alternative of using only a drop of enamel.
- You have to paint the inside of the ears with light pink again making another filled triangle.
- Between the ears and the eyes begin to make small flowers for that you have to make a very small point of pink and white next to each other and mix combining in a circular way.
- To make the unicorn’s eyelashes you have to do with the detail brush three curved lines that come out of the eyes.
- It is time to make the inner part of the eyes, for that what you have to do is white mole inside the black and then another smaller point to represent the tender look of the unicorn or horse
- With the top coat you finish the children’s nail art.
- But as a detail if you want you can glue an oval shiny stone to represent the horn so characteristic of this mythological and fantasy animal.
Images of Easy Nail Designs For Little Girls
little pigs

You can practice your designs in bottles before applying on the nails to be sure of what you do and have greater precision. (ademas es una buena manera de decorar bonito un elemento para el hogar)
Diseños de gatos, fijate que el gato puede hacerse en uñas de gel también.

caritas

chispas

cinta

Huellas. Para que te quede linda la uña puedes utilizar un poco la lima para darle forma.

pajaritos

Puedes hacerte la mejor pedicure haciendo estas figuras en las uñas del pie para el verano donde se usa sandalias es algo maravilloso que le gusta a los más pequeños.
Pollito

Decoración de Uñas Navideñas para Niñas
Para este caso en navidad muchas chicas quieren lucir sus uñas muy bonitas y decorativas con colores temáticos navideños como puede ser el negro, rojo y blanco.
Puedes utilizar para esto esmaltes no tóxicos o bien diseños con un pegamento adhesivo para pegar en la uña.

diseno unas navidad
Las pequeñas princesas aman esta fecha por la festividad por que puedes hacer desde arboles navideños, bolas decorativas, renos, regalos, santa claus y cientos de motivos que transmiten alegría y amor en este arte tan bonito.
Uñas cortas decoradas para niñas
Esta es una pregunta que me hacen ya que rara vez veremos una niña pequeña que tenga las uñas muy largas por lo cual todo tipo de modelo o figura que encuentres en este articulo puedes estar segura que se pueden realizar en uñas cortas.
Por lo cual comienza a obtener ideas y piensa como quieres que se vea la mano de tu hija para hacer un dibujo original, divertido y sobre todo entretenido para que todo sea un juego entre madre e hija en base al nailart
Nunca descuides los pies!
aunque a las pequeñas princesas les gusta verse las manos decoradas, los pies en época de verano es un factor crucial para estar arreglada y mostrarle a las amigas, principalmente por que se utiliza calzado descubierto y ademas es la temporada de piscina por el calor.
Intenta buscar diseños simples nada complicados al principio puedes compartir también en facebook o en twitter los que a ti te gustan.
O buscar nuevos diseños en pinterest o instagram que existe una amplia variedad aunque no tanto para niñas generalmente por lo cual te puedes ayudar basando en personajes de Disney que nunca fallan desde princesas hasta dibujos animados femeninos.
También te pueden interesar estos temas:


